Git & GitHub / GitHub Basics
Cloning and Creating Repositories
In this tutorial, you'll learn how to create and clone GitHub repositories. These are essential skills for managing your own projects and collaborating on others'.
Section overview
5 resourcesIntroduces the basics of GitHub, including repositories, pull requests, and forking.
Introduction
Goal
In this tutorial, we aim to discuss how to clone and create repositories on GitHub. GitHub is a web-based hosting service for version control and collaboration. It allows you to work on projects collaboratively, making it a vital tool for developers.
What You Will Learn
By the end of this tutorial, you will learn how to:
- Create a new repository on GitHub
- Clone a GitHub repository to your local machine
Prerequisites
To follow along with this tutorial, you should have:
- A basic understanding of Git and GitHub
- Git installed on your local machine
- A GitHub account
Step-by-Step Guide
Creating a New Repository
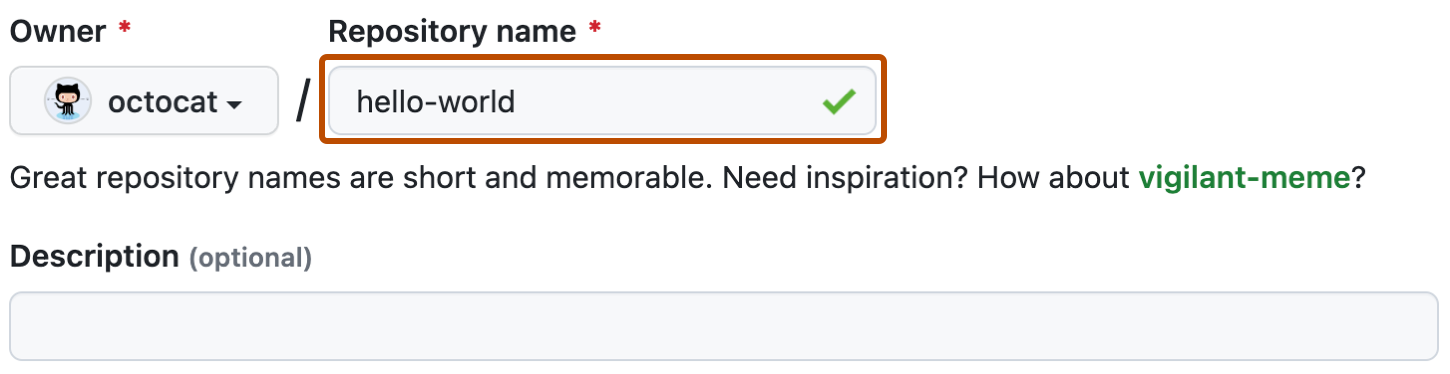
Creating a repository on GitHub is straightforward. Here are the steps you need to follow:
- Log in to your GitHub account.
- Click the "+" icon in the upper right corner and select "New repository".
- Name your repository, provide a short description, select either public or private, then click "Create repository".
Cloning a Repository
Cloning a repository means creating a local copy of a repository on your computer. This is the typical way to download code from a repository. You can do this by running the following command in your terminal:
git clone https://github.com/username/repository.git
Be sure to replace username with the GitHub account's username and repository with the name of the repository you wish to clone.
Code Examples
Here are some practical examples:
Creating a New Repository
Below is a step-by-step guide on creating a new repository:
- After logging into your GitHub account, click the "+" icon in the upper right corner, then select "New repository".

- Enter your desired repository name (for example, "my-first-repo"), provide a description (optional), select either public or private, and click "Create repository".
Cloning a Repository
To clone a repository, follow the steps below:
- On GitHub, navigate to the main page of the repository.
- Under the repository name, click "Clone or download".

- In the "Clone with HTTPs" section, click the clipboard icon to copy the clone URL for the repository.

- Open your terminal, navigate to the location where you want the cloned directory to be made.
- Type
git clone, and then paste the URL you copied earlier. It will look like this:
git clone https://github.com/username/my-first-repo.git
Press Enter and your local clone will be created.
Summary
In this tutorial, we learned how to create and clone a GitHub repository. These are fundamental skills for version control and collaborative projects on GitHub.
Practice Exercises
-
Create a public repository on GitHub. Name it "Hello World" and add a README file during the creation process.
-
Clone this repository to your local machine. Navigate to the cloned repository's local directory via your terminal.
-
Create a private repository on GitHub. Name it "Private Repo" and do not initialize it with a README file.
Solutions and Tips
-
Creating a repository is straightforward. Remember to select "Initialize this repository with a README" to add a README file.
-
When cloning, remember to replace
usernameandrepositoryin thegit clonecommand with your GitHub username and the name of the repository you're cloning. -
While creating a private repository, do not tick the "Initialize this repository with a README" option. This will create a repository without a README file.
Remember: Practice makes perfect. Keep creating and cloning repositories to familiarize yourself with these processes.
Need Help Implementing This?
We build custom systems, plugins, and scalable infrastructure.
Related topics
Keep learning with adjacent tracks.
Popular tools
Helpful utilities for quick tasks.
Latest articles
Fresh insights from the CodiWiki team.
AI in Drug Discovery: Accelerating Medical Breakthroughs
In the rapidly evolving landscape of healthcare and pharmaceuticals, Artificial Intelligence (AI) in drug dis…
Read articleAI in Retail: Personalized Shopping and Inventory Management
In the rapidly evolving retail landscape, the integration of Artificial Intelligence (AI) is revolutionizing …
Read articleAI in Public Safety: Predictive Policing and Crime Prevention
In the realm of public safety, the integration of Artificial Intelligence (AI) stands as a beacon of innovati…
Read articleAI in Mental Health: Assisting with Therapy and Diagnostics
In the realm of mental health, the integration of Artificial Intelligence (AI) stands as a beacon of hope and…
Read articleAI in Legal Compliance: Ensuring Regulatory Adherence
In an era where technology continually reshapes the boundaries of industries, Artificial Intelligence (AI) in…
Read article